How to Make a Lead Magnet on Squarespace
Creating a lead magnet is one of the most effective ways to grow your email list.
But how do you do it?
It seems like there are so many variables and steps that go into it, which makes it hard to wrap your mind around. I know that’s how I felt.
As someone who likes to keep things simple and have my monthly fees for running my website low, I knew I had to find a solution.
Enter, Squarespace. For as low as $10 per month, you can start growing your email list with an automated email. Let me walk you through how to set up a lead magnet o in the easiest way possible.
We’ll cover:
Is a lead magnet right for you?
What you need before you add a lead magnet to your Squarespace site.
Which email marketing plan you should choose.
How to set up your lead magnet as an automation for your site.
I have a small audience. Do I even need a lead magnet?
The TLDR? Yes.
According to GetResponse, email continues to generate the highest ROI over all other marketing strategies. And when you factor in the fact that 96% of people who visit your website aren’t ready to buy (Marketo) it’s easy to see how having your audience on a list that allows you to send them personalized content over time will be hugely beneficial to your business.
It’s tempting to wait until you get more traction to start an email list, but what worked for me was getting all of it figured out before I started getting traction so I was ready to meet that wave. It’s often better to do things before you’re ready so they can grow with you vs. being totally overwhelmed with the extra responsibilities that come with business growth.
How this relates specifically to TikTok marketing
When I got my first viral video on TikTok, it pushed me over the 1k follower mark. That enabled me to add a link to my profile and I was able to capture that momentum and grow my list by 100 overnight. 100 leads may sound like small potatoes to some, but for me it was a huge step in the right direction!
Furthermore, if you primarily use platforms like TikTok to market your business, you might notice that a lot of traffic is from your FYP (For You Page). That means that it’s crucial to 1) get that person to follow you if the content resonates and 2) get them on your list before they fly back out into the TikTok universe.
What do I need before I create a lead magnet on Squarespace?
You’ll need:
An active Squarespace site
A well-designed lead magnet is exported as a PDF (or other file type depending on what it is).
A cloud-based account like Google Drive to write your email hard copy. See my short video here on how I organize my Google Drive.
Which email marketing plan on Squarespace should I choose?
At the time of writing, my current Squarespace setup is as follows:
Business Plan
This website plan is only so I can have products listed for sale. You can use the Email Campaigns feature on Personal, Business, and Commerce plans.
Campaigns Core Plan
The reason why you need the Core plan instead of the starter plan is because the Core plan allows the Email Automation feature. This feature is what allows your lead magnet to be automatically sent when someone signs up.
The Core email campaign plan on Squarespace is $14 per month if you pay on a month-to-month basis or $10 a month if you pay annually. I recommend giving it a shot for a month before signing up for the annual billing just to be sure it works well with what you’re looking for.
How to set up a Squarespace lead magnet as an automation
Step 1: Set up a Mailing List
Click the Marketing tab in the Squarespace navigation panel. Next, click Email Campaigns. Click the Mailing Lists link in the left panel and then click Add in the top right. This allows you to create and name a mailing list, which we will later link to our sign-up forms.
If you have email subscribers already and would like to import them to Squarespace, check out this article.
Step 2: Create a Download page for your lead magnet
In the Home tab on Squarespace, create a new page and name it Download. Make sure the URL slug also says Download.
Drag the page under the Not Linked section in the left panel that shows all of your website pages.
Design your page to have the following things:
Headline copy that matches your brand tone. Ex: “Yay, your download is here!”
An image of the lead magnet
A line of text that says “Here’s your copy of [Lead Magnet Name].
A button that says “Download.”
These things are the bare minimum, you can make it as fancy as you want but make sure those things are prominently displayed and easy to find.
Once you have all of that set up, click on your button and tap Edit. This will open a small pop-up that has 2 tabs: Content and Design. Under the Content tab, click the settings gear icon under the Link form field.
This will open the Link Editor modal. From the list of options on the left, choose File. Upload your lead magnet file and click the checkbox to enable it. I also like to turn on the Open in New Window feature for the best user experience.
Save your work and we’ll go onto the next step.
Step 3: Create your automation to send your lead magnet to your Squarespace email list
Under Email Campaigns click the Create button.
Choose the Welcome New Subscribers option. Next, you’ll be able to select a template style and click Use This Template.
Customize the design of your email template as you wish and add your brand logo under the Site Styles section. If you’ve already added a logo to your Squarespace site you can add that same one here in one click!
Next, click the Email tab. The Automation field will say After Subscription as the type. Make sure the Timing in this section is marked Immediately.
Add your subject line and email preview text. Lastly, add your Sender Details and Address as required.
Fill in the body of the email with a message that thanks the reader for subscribing and a button that will direct them to the Download page you created. End with a sign-off that helps set expectations around what to expect from you (ex: “I’ll be popping in to share [what] [when] so you can [how they will benefit]).
You can Send a Test email (highly recommend doing this until you are comfortable with Squarespace) and then Activate your automation.
Step 4: Enable the ability to sign up for your lead magnet
Now we’ve got the email list set up, it’s time to give your audience a place to sign up!
This step can be as simple as adding a Newsletter block to a page on your site, but since visitors are often coming in through a referral source, I like to have a nicely designed landing page so there’s no getting distracted in signing up.
Create a new page and name it the title of your lead magnet. Drag it to the Not Linked section in your Squarespace navigation.
Next up, design your page. If you’re on Squarespace 7.1 or later you’ll add a Section and then put Blocks inside of it that has images and your sign up form.
For page content I recommend:
A page title (the title of your lead magnet along with verbiage about signing up works here).
An image of the lead magnet (noticing a pattern?)
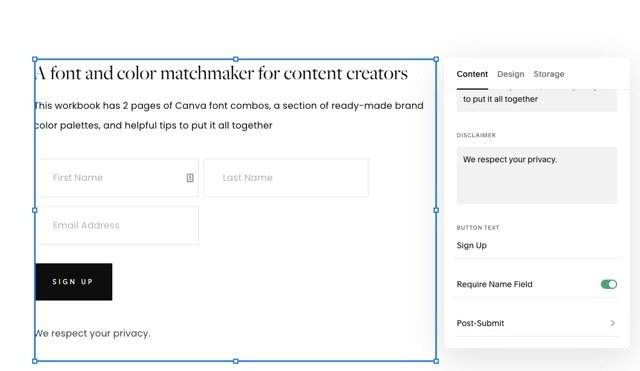
A Newsletter Block (Add Block > Newsletter)
Here’s how to set up your Newsletter Block under the Content tab:
Add a title and description.
Under button text add “Sign up”
Enable the Require Name Field switch.
Under Post Submit add a message that says “Thank you! Thank you! After you confirm your email, you’ll receive a link to [Name of Lead Magnet].”
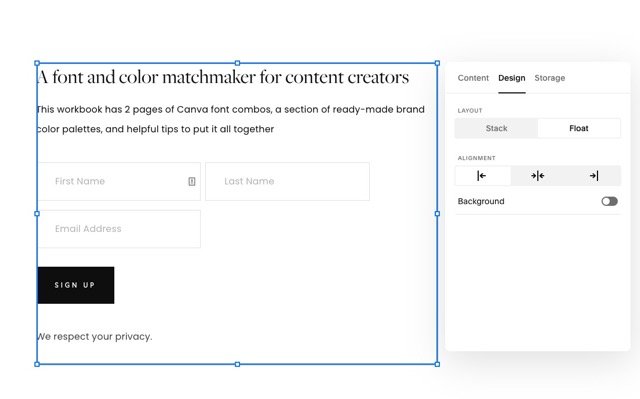
Next, go to the Design tab
Choose Float or Stack depending on your page design
Choose your Alignment
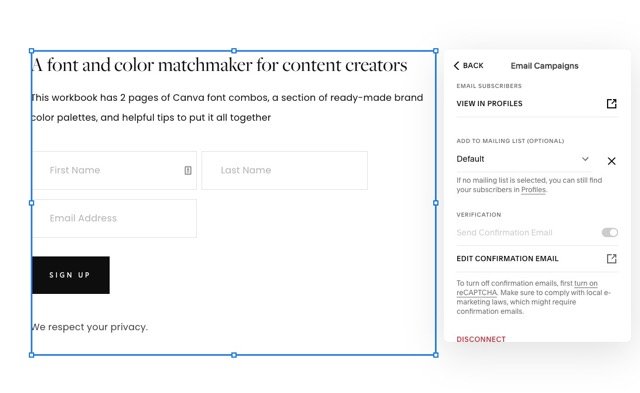
Finally, on the Storage tab
Click the Squarespace Email Campaigns section and under Add to Mailing List choose the name of the mailing list you created.
Save your page.
Step 5: Test signing up for your lead magnet
Once you complete all of these steps you will have:
An email subscriber list that will contain all the email addresses of people who sign up.
A landing page for prospective leads to sign up. The newsletter block on this page adds the person signing up to your email list and will trigger your welcome email.
The welcome email will be delivered to anyone who signs up from your landing page automatically. The welcome email contains a button that directs them to the download page of your website.
The download page of your website contains a button that has the file to your lead magnet embedded in it.
Whew! There are a lot of moving parts but once it’s all connected you won’t have to worry about it because it will be out there gathering leads on your behalf 😊
The last step is to go to your website and test your sign-up form to make sure everything works as planned. Once you verify everything is working you can share your lead magnet sign-up page with the world! I like to include mine in my Squarespace Bio Site.
Conclusion: How to Make a Lead Magnet on Squarespace
Even if you’ve never had an email list in your lift, you can create an automated system that will enable you to capture leads and grow your business.
There are tons of options out there such as the beautifully designed Flodesk but if you’re like me and are wanting to keep things trim, using Squarespace to manage your lead magnet it a great solution.
I love that everything is connected so I only have to log into one place. Additionally, it’s super easy to link the email list to your website and they make it easy to incorporate your content into emails if you want to send a newsletter. At the bottom of my newsletters I always pull in my 2 latest blog posts.
And shameless plug: if you want to experience how I have my lead magnet set up (and get an awesome freebie), you can sign up here.


